Living in a camper van can be fun and freeing. You can travel, explore, and sleep almost anywhere. But one common problem many van owners face is light, heat, and lack of privacy. Bright sunlight can wake you up too early. Street lights can shine in at night. And people can see inside your van if your windows are not covered.
That’s where DIY magnetic window covers come in. They are simple to make, easy to use, and very effective. Best of all, they can help improve your comfort and rest without spending a lot of money.
In this guide, you will learn how to make your own magnetic window covers step by step.
Why Magnetic Window Covers Are a Smart Choice
Magnetic window covers are popular for a reason. They solve many problems at once.
First, they give you privacy. When your windows are covered, no one can see inside your van. This helps you feel safe, especially when parked in busy areas.
Second, they help with temperature control. In hot weather, they reflect sunlight and keep your van cooler. In cold weather, they help hold heat inside.
Third, they block light. This is very important if you want better rest. Darkness helps your body relax and stay asleep longer.
Finally, they are easy to install and remove. You don’t need to drill holes or damage your van. The magnets hold the covers in place, and you can take them down in seconds.
Compared to curtains or permanent shades, magnetic covers are faster, cleaner, and more flexible.
Materials and Tools You Will Need
Before you start, gather your supplies. Most of these items are easy to find at a hardware or craft store.
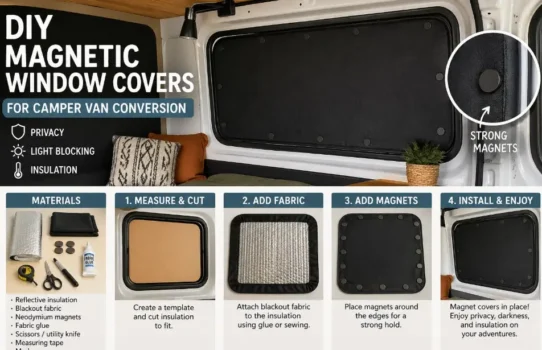
Here’s what you’ll need:
- Reflective insulation (like Reflectix)
- Fabric (blackout fabric works best)
- Strong magnets (neodymium magnets are ideal)
- Fabric glue or spray adhesive
- Scissors or a utility knife
- Measuring tape
- Marker or chalk
Optional tools:
- Sewing machine or needle and thread
- Cardboard or paper for templates
Step 1: Measure Your Windows
Good measurements are the key to a great fit.
Start by measuring each window in your van. Windows are not always perfect squares or rectangles, so take your time.
A helpful trick is to use cardboard or paper to make a template. Hold it up to the window and trace the shape. Then cut it out and test the fit.
Make sure your template covers the whole window. It’s okay to make it slightly larger. This helps block more light.
Step 2: Cut the Insulation
Now take your template and place it on the reflective insulation.
Trace the shape with a marker. Then carefully cut it out using scissors or a utility knife.
After cutting, test the piece in your window. Make sure it fits well. Trim any edges if needed.
This layer is important because it reflects heat and helps control temperature inside your van.
Step 3: Add Fabric for Comfort and Style
Next, you will cover the insulation with fabric.
Blackout fabric is a great choice because it blocks light and looks nice. You can also pick a color or pattern that matches your van’s interior.
Lay the fabric flat, then place the insulation on top. Cut the fabric so it is slightly bigger than the insulation.
You can attach the fabric using:
- Fabric glue
- Spray adhesive
- Sewing (for a stronger hold)
Some people like to make double-sided covers. One side can be dark for sleeping, and the other side can be lighter for daytime use.

Step 4: Install the Magnets
Magnets are what make these covers so easy to use.
Place magnets around the edges of your cover. Focus on the corners and space them evenly along the sides.
You can attach magnets by:
- Gluing them between fabric layers
- Sewing small pockets for them
- Using strong tape for extra support
Make sure the magnets are secure. Loose magnets can fall off over time.
Also, be careful not to scratch your window frames. You can add a small layer of fabric over the magnets to protect surfaces.
Step 5: Fit the Covers to Your Windows
Now it’s time to test your covers.
Place each cover against the window. The magnets should stick to the metal frame around the window.
Adjust the position until the cover sits flat and snug. There should be no big gaps where light can come through.
If you notice loose areas, you can add more magnets or move them to better spots.
Step 6: Test for Light and Insulation
Once your covers are in place, test how well they work.
Close all the covers and sit inside your van. Check for light leaks. If you see light coming through, adjust the fit or add extra material.
You can also test them during the day. Notice how much cooler your van feels with the covers on.
At night, you’ll likely see a big difference in how dark and comfortable your space becomes. This can make a big impact on rest quality, especially when focusing on RV sleep or mattress comfort improvements.
Optional Upgrades and Ideas
After you finish your basic covers, you can add extra features.
Here are some ideas:
- Pull tabs: Add small loops to make removal easier
- Labels: Mark each cover for its window
- Extra layers: Add more insulation for cold weather
- Decorative fabric: Match your van’s style
These small upgrades can make your covers even more useful and enjoyable.
Maintenance and Storage Tips
To keep your covers in good shape, follow these simple tips:
- Wipe them clean with a damp cloth
- Store them flat when not in use
- Avoid bending the magnets too much
- Check the glue or stitching over time
Taking care of your covers will help them last longer and perform better.
Common Mistakes to Avoid
Many beginners make a few simple mistakes. You can avoid them with a little planning.
- Using weak magnets: This can cause covers to fall down
- Bad measurements: Leads to poor fit and light leaks
- Skipping test fits: Always check before final assembly
- Wrong adhesive: Some glues don’t hold well over time
Fixing these issues early will save you time and effort later.
Cost Breakdown
One of the best things about this project is the low cost.
Here’s a rough estimate:
- Reflective insulation: $20–$40
- Fabric: $15–$30
- Magnets: $10–$25
- Adhesive: $5–$15
Total cost: around $50–$100
This is much cheaper than buying pre-made covers, which can cost several hundred dollars.
Final Thoughts
DIY magnetic window covers are a simple and smart upgrade for any camper van. They help block light, control temperature, and give you privacy wherever you go.
Best of all, they can improve how well you rest at night. When your van is dark, quiet, and comfortable, it’s much easier to relax and recharge. That’s a big win for anyone focused on better RV sleep or mattress comfort while traveling.
With just a few tools and a little time, you can build your own custom covers that fit your van perfectly. Once you try them, you’ll wonder how you ever traveled without them.